 15 hours ago
3
15 hours ago
3
Club.noww.in
End-to-end Project Implementation
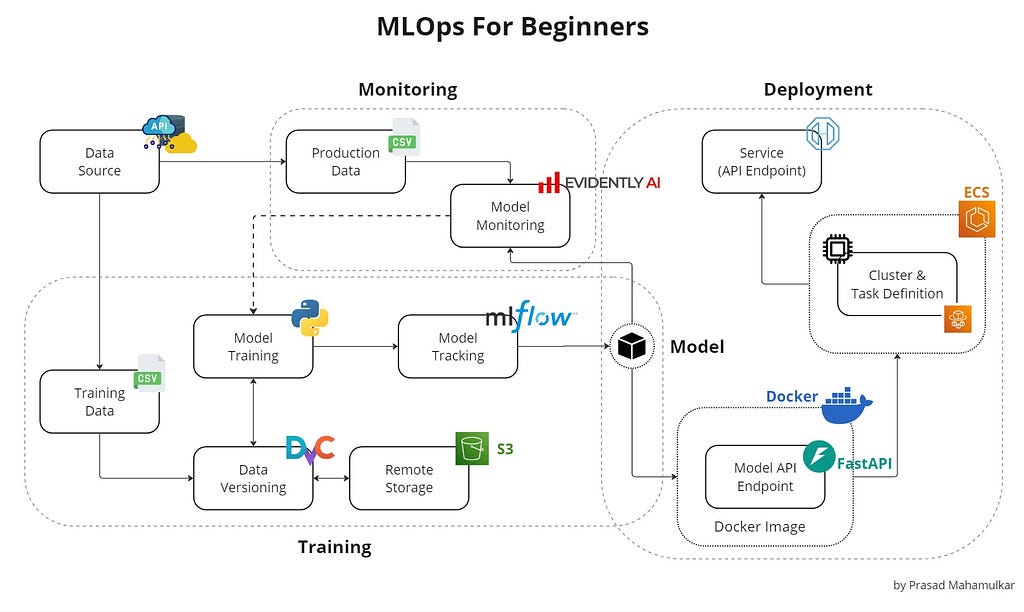 Image created by the author
Developing, deploying, and maintaining machine learning models in production can be challenging and complex. This is where Machine Learning Operations (MLOps) comes into play. MLOps is a set of practices that automate and simplify machine learning (ML) workflows and deployments. In this article, I will be sharing some basic MLOps practices and tools through an end-to-end project implementation that will help you manage machine learning projects more efficiently, from development to production.
After reading this article, you will know:
- How to use DVC for data versioning.
- How to track logs, artifacts, and register model versions using MLflow.
- How to deploy a model using FastAPI, Docker, and AWS ECS.
- How to monitor a model in production using Evidently AI.
All the code used in this article is available on GitHub.
Please note that GIF examples might not load completely in the Medium app but should work fine in a browser.Before we start, let’s first quickly understand what is MLOps.
What is MLOps?
MLOps is a set of techniques and practices designed to simplify and automate the lifecycle of machine learning (ML) systems. MLOps aims to improve the efficiency and reliability of deploying ML models into production by providing clear guidelines and responsibilities for professionals and researchers. It bridges the gap between ML development and production, ensuring that machine learning models can be efficiently developed, deployed, managed, and maintained in real-world environments. This approach helps reduce system design errors, enabling more robust and accurate predictions in real-world settings.
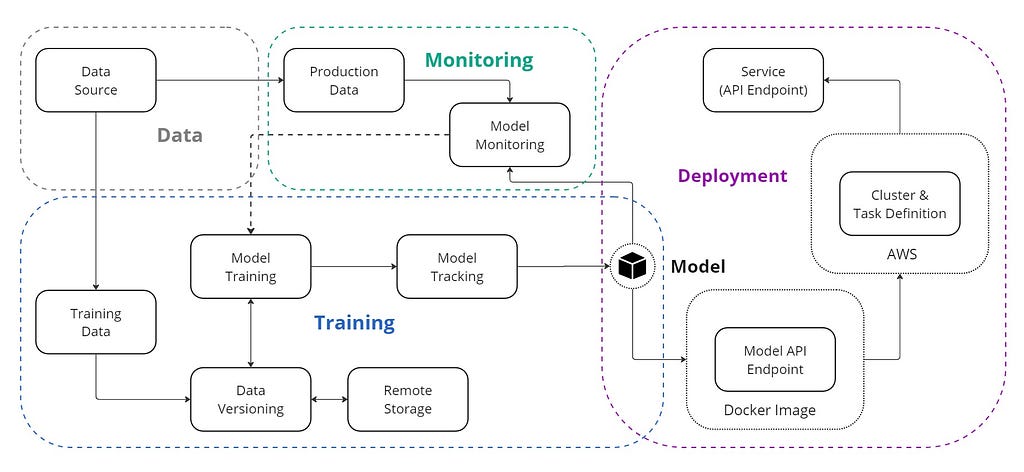 Image created by the author
Why do we need MLOps?
Typically, any machine learning project starts with defining the business problem. Once the problem is defined, data extraction, data preparation, feature engineering, and model training steps are implemented to develop the model. After the model is developed, it is usually stored somewhere so that the engineering and operations teams can deploy it for production use.
What is wrong with this approach?
It creates a gap between the development and deployment phases, leading to inefficiencies and potential errors. Without collaboration between data scientists and engineers, models may not be optimized for production, which can result in issues such as performance degradation, lack of scalability, and maintenance difficulties.
MLOps solves these problems by creating a unified workflow that integrates development and operations. It ensures that models are reliable, scalable, and easier to maintain. This approach reduces the risk of errors, accelerates deployment, and keeps models effective and up-to-date through continuous monitoring.
Now that we have a basic understanding of MLOps, let’s move on to the implementation part.
Project Setup
Machine learning project requires a standard project structure to ensure it can be easily maintained and modified. A good project structure allows team members to collaborate easily and effectively.
For this project, we will use a very basic structure that will help us manage the entire lifecycle of a machine learning project, including data ingestion, preprocessing, model training, evaluation, deployment, and monitoring.
To begin, clone the mlops-project repository from GitHub and follow along.
#clone repository from githubgit clone https://github.com/prsdm/mlops-project.git
After cloning the repository the project structure will look something like this:
.├── .github # DVC metadata and configuration
│ └── workflows # GitHub Actions workflows for CI/CD
│ └── docs.yml
├── data # Directory for storing data files
│ ├── train.csv
│ └── test.csv
├── docs # Project documentation.
│ └── index.md
├── models # Store trained models
├── mlruns # Directory for MLflow run logs and artifacts
├── steps # Source code for data processing and model training
│ ├── __init__.py
│ ├── ingest.py
│ ├── clean.py
│ ├── train.py
│ └── predict.py
├── tests # Directory to store tests
│ ├── __init__.py
│ ├── test_ingest.py
│ └── test_clean.py
├── .gitignore # To ignore files that can't commit to Git
├── app.py # FastAPI app file
├── config.yml # Configuration file
├── data.dvc # For tracking data files and their versions
├── dataset.py # Script to download or generate data
├── dockerfile # Dockerfile for containerizing FastAPI
├── LICENSE # License for project
├── main.py # To automate model training
├── Makefile # To store useful commands to make train or make test
├── mkdocs.yml # Configuration file for MkDocs
├── README.md # Project description
├── requirements.txt # Requirements file for reproducing the environment.
├── samples.json # Sample data for testing
'''Extra files for monitoring'''
├── data
│ └──production.csv # data for Monitoring
├── monitor.ipynb # Model Monitoring notebook
├── test_data.html # monitoring results for test data
└── production_data.html # monitoring results for production data
Here is a breakdown of the structure:
- data: Stores data files used for model training and evaluation.
- docs: Contains project documentation.
- models: Stores trained machine learning models.
- mlruns: Contains logs and artifacts generated by MLflow.
- steps: Includes source code for data ingestion, cleaning, and model training.
- tests: Includes unit tests to verify the functionality of the code.
- app.py: Contains the FastAPI application code for deploying the model.
- config.yml: Configuration file for storing project parameters and paths.
- data.dvc: Tracks data files and their versions using DVC.
- dataset.py: Script for downloading or generating data.
- dockerfile: Used to build a Docker image for containerizing the FastAPI application.
- main.py: Automates the model training process.
- Makefile: Contains commands for automating tasks such as training or testing.
- mkdocs.yml: Configuration file for MkDocs, used to generate project documentation.
- requirements.txt: Contains all the required packages for the project.
- samples.json: Contains sample data for testing purposes.
- monitor.ipynb: Jupyter notebook for monitoring model performance.
- production_data.html and test_data.html: Stores monitoring results for test and production data.
This project structure is designed to organize the entire machine learning project, from development to monitoring.
Now, let's create a virtual environment and activate it using the following commands:
For bash:
#create venvpython3 -m venv venv#activate
source venv/bin/activate
For cmd:
#create venvpython -m venv venv#activate
.\venv\Scripts\activate
Next, install all required packages using the requirements.txt file.
#install all the dependanciespip install -r requirements.txt
Example:
 Example of project setup
With the environment set up and dependencies installed, we can now move on to the model training part.
Model Training
In model training, the first step is to get data from the source, which could be either local storage or remote storage. To do this, run the dataset.py file.
#to get data from sourcepython3 dataset.py
This script retrieves the data from its source, splits it into training and testing datasets, and then stores them in the data/ directory.
Example:
 Example of data extraction
Once the data is stored in the data directory, the next steps include cleaning, processing, and model training. The steps/ folder contains modules for each of these stages.
#model training part from project structure├── steps/
│ ├── ingest.py
│ ├── clean.py
│ ├── train.py
│ └── predict.py
├── main.py
├── models/model.pkl
Let's take a look at what each file does:
- ingestion.py handles the initial data ingestion, ensuring that data is correctly loaded and available for the next stages.
- clean.py focuses on data cleaning tasks, such as handling missing values, removing duplicates, and making other data quality improvements.
- train.py responsible for training the model on the cleaned data and saving the model as model.pkl in the models/ directory.
- predict.pyis used to evaluate model performance on test data using the trained model.
To run all these steps in sequence, execute the main.py file:
#to train the modelpython3 main.py
Here’s how the main.py file looks in this project:
import loggingfrom steps.ingest import Ingestion
from steps.clean import Cleaner
from steps.train import Trainer
from steps.predict import Predictor
# Set up logging
logging.basicConfig(level=logging.INFO,format='%(asctime)s:%(levelname)s:%(message)s')
def main():
# Load data
ingestion = Ingestion()
train, test = ingestion.load_data()
logging.info("Data ingestion completed successfully")
# Clean data
cleaner = Cleaner()
train_data = cleaner.clean_data(train)
test_data = cleaner.clean_data(test)
logging.info("Data cleaning completed successfully")
# Prepare and train model
trainer = Trainer()
X_train, y_train = trainer.feature_target_separator(train_data)
trainer.train_model(X_train, y_train)
trainer.save_model()
logging.info("Model training completed successfully")
# Evaluate model
predictor = Predictor()
X_test, y_test = predictor.feature_target_separator(test_data)
accuracy, class_report, roc_auc_score = predictor.evaluate_model(X_test, y_test)
logging.info("Model evaluation completed successfully")
# Print evaluation results
print("\n============= Model Evaluation Results ==============")
print(f"Model: {trainer.model_name}")
print(f"Accuracy Score: {accuracy:.4f}, ROC AUC Score: {roc_auc_score:.4f}")
print(f"\n{class_report}")
print("=====================================================\n")
if __name__ == "__main__":
main()
Example:
 Example of model training
Now, let’s see how we can improve this project using tools like DVC and MLflow.
Data Version Control (DVC)
Let’s start with Data Version Control (DVC), a free, open-source tool designed to manage large datasets, automate ML pipelines, and handle experiments. It helps data science and machine learning teams manage their data more effectively, ensure reproducibility, and improve collaboration.
Why use DVC over GitHub?
Git is excellent for versioning source code and text files, but it has limitations when dealing with large binary files such as datasets. Git does not provide meaningful comparisons between versions of binary files; it only stores new versions without showing detailed differences, making it challenging to track changes over time. Additionally, storing large datasets or sensitive data in GitHub is not ideal, as it can lead to bloated repositories and potential security risks.
DVC addresses these issues by managing large files through metadata and external storage (such as S3, Google Cloud Storage, or Azure Blob Storage) while maintaining detailed tracking of data changes and version history. DVC uses human-readable metafiles to define data versions and integrates with Git or any source control management (SCM) tool to version and share the entire project, including data assets. Additionally, it provides secure collaboration by controlling access to project components and sharing them with designated teams and individuals.
To get started with DVC, first install it (if it’s not already installed):
#install DVC via pippip install dvc
Then, initialize DVC:
#initialize a DVCdvc init
This sets up the necessary DVC configuration files.
Now, add data files to DVC:
#add datadvc add data
This tracks the data files with DVC, storing the actual data in external storage.
Configure remote storage:
#add remote storage configurationdvc remote add -d <remote_name> <remote_storage_path>
Replace <remote_name> with a name for remote storage and <remote_storage_path> with the path to the remote storage (e.g., s3://mybucket/mydata).
Push data to remote storage:
#commit the DVC configuration changes to Gitgit commit .dvc/config -m 'config dvc store'#upload data to the configured remote storage
dvc push
This uploads data to the configured remote storage.
Push all committed changes to git:
#push all committed changes to the Git repositorygit push origin main
Example:
 Example of DVC push
To pull the latest data version from remote storage to the local directory, use the following command:
#pull the latest version of the datadvc pull
Example:
 Example of DVC pull
By integrating DVC, we can manage large datasets efficiently while keeping the Git repository focused on source code.
Note: We can use DVC to version models just like data files.MLflow
After versioning data with DVC, it’s crucial to maintain a clear record of model training, version changes, and parameter configurations, even if we are not actively experimenting with multiple models.
Without systematic tracking, several issues can arise:
- Loss of Version Details: Without keeping track of which parameters and code changes were used for each model version, it becomes hard to reproduce or build on past work. This can slow down the progress and cause repeated mistakes.
- Difficulty in Version Comparison: Consistently recording how well each model performs helps compare different versions. Without this, it is tough to see if a model is improving or not.
- Collaboration Challenges: In a team, not having a clear way to manage model versions can lead to confusion and accidental overwrites of each other’s work, complicating the collaborative process.
This is where MLflow comes in. MLflow is not just for experimenting; it also plays a critical role in tracking the lifecycle of ML models. It logs metrics, artifacts, and parameters, ensuring that every version change is documented and easily retrievable. With MLflow, we can monitor each run, and compare different versions. So that the most effective model is always identifiable and ready for deployment.
To integrate MLflow, first install MLflow (if it’s not already installed):
#install mlfowpip install mlflow
Then update the main.py file to include logging of parameters, metrics, and models. The code will look something like this:
import loggingimport yaml
import mlflow
import mlflow.sklearn
from steps.ingest import Ingestion
from steps.clean import Cleaner
from steps.train import Trainer
from steps.predict import Predictor
from sklearn.metrics import classification_report
# Set up logging
logging.basicConfig(level=logging.INFO,format='%(asctime)s:%(levelname)s:%(message)s')
def main():
with open('config.yml', 'r') as file:
config = yaml.safe_load(file)
mlflow.set_experiment("Model Training Experiment")
with mlflow.start_run() as run:
# Load data
ingestion = Ingestion()
train, test = ingestion.load_data()
logging.info("Data ingestion completed successfully")
# Clean data
cleaner = Cleaner()
train_data = cleaner.clean_data(train)
test_data = cleaner.clean_data(test)
logging.info("Data cleaning completed successfully")
# Prepare and train model
trainer = Trainer()
X_train, y_train = trainer.feature_target_separator(train_data)
trainer.train_model(X_train, y_train)
trainer.save_model()
logging.info("Model training completed successfully")
# Evaluate model
predictor = Predictor()
X_test, y_test = predictor.feature_target_separator(test_data)
accuracy, class_report, roc_auc_score = predictor.evaluate_model(X_test, y_test)
report = classification_report(y_test, trainer.pipeline.predict(X_test), output_dict=True)
logging.info("Model evaluation completed successfully")
# Tags
mlflow.set_tag('Model developer', 'prsdm')
mlflow.set_tag('preprocessing', 'OneHotEncoder, Standard Scaler, and MinMax Scaler')
# Log metrics
model_params = config['model']['params']
mlflow.log_params(model_params)
mlflow.log_metric("accuracy", accuracy)
mlflow.log_metric("roc", roc_auc_score)
mlflow.log_metric('precision', report['weighted avg']['precision'])
mlflow.log_metric('recall', report['weighted avg']['recall'])
mlflow.sklearn.log_model(trainer.pipeline, "model")
# Register the model
model_name = "insurance_model"
model_uri = f"runs:/{run.info.run_id}/model"
mlflow.register_model(model_uri, model_name)
logging.info("MLflow tracking completed successfully")
# Print evaluation results
print("\n============= Model Evaluation Results ==============")
print(f"Model: {trainer.model_name}")
print(f"Accuracy Score: {accuracy:.4f}, ROC AUC Score: {roc_auc_score:.4f}")
print(f"\n{class_report}")
print("=====================================================\n")
if __name__ == "__main__":
main()
Next, run the main.py script and view experiment details using the following command:
#to launch MLflow UImlflow ui
Open the provided URL http://127.0.0.1:5000 in a browser to explore and compare logged parameters, metrics, and models.
Example:
 Example of MLflow tracking
 Example of MLflow model comparison
By using MLflow, we can easily track model versions and manage changes, ensuring reproducibility and the ability to select the most effective model for deployment.
Before we move to the deployment part, let’s take a look at the Makefile and config.yml files that are present in the project. These files help simplify the workflow and ensure consistency in the project setup and configuration.
Makefile
Using make file can be very helpful for managing Python projects. Many Data Scientists and ML Engineers don’t realize this but makecan automate routine tasks such as setting up the environment, installing dependencies, model training, running tests, and cleaning up files, which saves time and reduces mistakes. make file is commonly used in software development because it helps manage long and complex commands that are difficult to remember.
The make file in this project looks something like this:
bash:
python = venv/bin/pythonpip = venv/bin/pip
setup:
python3 -m venv venv
$(python) -m pip install --upgrade pip
$(pip) install -r requirements.txt
run:
$(python) main.py
mlflow:
venv/bin/mlflow ui
test:
$(python) -m pytest
clean:
rm -rf steps/__pycache__
rm -rf __pycache__
rm -rf .pytest_cache
rm -rf tests/__pycache__
remove:
rm -rf venv
For Windows (cmd), the file needs to be modified a little bit.
python = venv/Scripts/pythonpip = venv/Scripts/pip
setup:
python -m venv venv
$(python) -m pip install --upgrade pip
$(pip) install -r requirements.txt
run:
$(python) main.py
mlflow:
venv/Scripts/mlflow ui
test:
$(python) -m pytest
clean:
@if exist steps\__pycache__ (rmdir /s /q steps\__pycache__)
@if exist __pycache__ (rmdir /s /q __pycache__)
@if exist .pytest_cache (rmdir /s /q .pytest_cache)
@if exist tests\__pycache__ (rmdir /s /q tests\__pycache__)
remove:
@if exist venv (rmdir /s /q venv)
Here’s a breakdown of each part:
- make setup: Creates a virtual environment (venv), upgrades pip, and installs the required packages from requirements.txt. This ensures that all dependencies are consistently installed across different environments.
- make run: Executes the main.py using the Python interpreter from the virtual environment.
- make mlflow: Starts the mlflow ui for tracking experiments and model metrics.
- make test: This command runs all test cases defined in the project using pytest.
- make clean: Removes cache files such as __pycache__, .pytest_cache, and other temporary files to keep the directory clean.
- make remove: Removes the virtual environment (venv) completely from the project.
Sample commands to run make file:
# For example, to set up the environmentmake setup
# OR To run the main script
make run
# OR To run the tests
make test
# so on...
Example:
 Example of Make Commands
By using the make file, we can automate and streamline various tasks, ensuring consistency and reducing manual errors across different environments.
Config.yml
YAML files are a great way to store and manage configuration settings for Machine Learning models. They help manage data/model paths, model parameters, and other configurations, making it easier to experiment with different configurations and maintain code reusability.
The Config.yml file looks like this:
data:train_path: data/train.csv
test_path: data/test.csv
train:
test_size: 0.2
random_state: 42
shuffle: true
model:
name: DecisionTreeClassifier
params:
criterion: entropy
max_depth: null
store_path: models/
# name: GradientBoostingClassifier
# params:
# max_depth: null
# n_estimators: 10
# store_path: models/
# name: RandomForestClassifier
# params:
# n_estimators: 50
# max_depth: 10
# random_state: 42
# store_path: models/
Here's what each part does:
- data: Specifies the paths to the training, test, and production (latest) datasets. This ensures that the data locations are managed in one place and can be easily updated.
- train: Contains parameters for splitting the data into training and test sets, such as test_size, random_state, and whether to shuffle the data. These settings help maintain consistent data splitting and reproducibility.
- model: Defines the model name, its parameters, and the location for storing the trained model. This configuration enables easy switching between different models, offering flexibility in model selection.
Using the config.yml file simplifies the management of model parameters and paths. It allows for easy experimentation with different configurations and models, improves reproducibility by keeping parameter settings consistent, and helps maintain cleaner code by separating configuration from code logic.
Example:
In the following example model is changed to ‘GradientBoostingClassifier’ based on the configuration specified in the config.yml file.
 Example of config.yml file
Now, let’s move on to the deployment part, where we will use FastAPI, Docker and AWS ECS. This setup will help us create a scalable and easily manageable application for serving machine learning model.
FastAPI
FastAPI is a modern framework for building APIs with Python. It is efficient for serving machine learning models due to its speed and simplicity.
First, install FastAPI and Uvicorn (if it’s not already installed):
#install fastapi and uvicornpip install fastapi uvicorn
Define the FastAPI application and endpoints for serving the model in the app.pyfile.
from fastapi import FastAPIfrom pydantic import BaseModel
import pandas as pd
import joblib
app = FastAPI()
class InputData(BaseModel):
Gender: str
Age: int
HasDrivingLicense: int
RegionID: float
Switch: int
PastAccident: str
AnnualPremium: float
model = joblib.load('models/model.pkl')
@app.get("/")
async def read_root():
return {"health_check": "OK", "model_version": 1}
@app.post("/predict")
async def predict(input_data: InputData):
df = pd.DataFrame([input_data.model_dump().values()],
columns=input_data.model_dump().keys())
pred = model.predict(df)
return {"predicted_class": int(pred[0])}
Then, test the FastAPI server locally at http://127.0.0.1:8000/docsusing the following command:
#run the FastAPI appuvicorn app:app --reload
Example:
 Example of FastAPI
Let’s now containerize this API using Docker.
Docker
Docker is an open-source platform that simplifies the deployment of software applications by packaging them into containers. These containers act as lightweight, portable units that include everything needed to run the application across different environments.
Why Use Containers?
Containers offer a streamlined way to isolate and deploy applications, ensuring they run consistently across various environments, whether on a developer’s laptop or the cloud. This isolation enhances portability and resource efficiency, making docker an essential tool for modern software development.
To install Docker, follow the instructions on the Docker website.
Now, create a Dockerfile in the project directory to build the Docker image:
#official Python 3.10 imageFROM python:3.10
#set the working directory
WORKDIR /app
#add app.py and models directory
COPY app.py .
COPY models/ ./models/
# add requirements file
COPY requirements.txt .
# install python libraries
RUN pip install --no-cache-dir -r requirements.txt
# specify default commands
CMD ["uvicorn", "app:app", "--host", "0.0.0.0", "--port", "80"]
Now, build a Docker image using the following command:
# To build docker imagedocker build -t <image_name> <path_to_dockerfile>
Example:
 Example of docker build
Finally, run the Docker container to test the API at http://localhost:80/predict:
# To run docker containerdocker run -d -p 80:80 <image_name>
Example:
 Example of docker run
To stop a running Docker container, find the container ID or name of the running container using the following command:
# To show running containersdocker ps
Once the container ID or name is identified, it can be stopped using the following command:
# To stop the containerdocker stop <container_id_or_name>
Example:
 Example of stopping running container
Now, to push the Docker image to Docker Hub, follow these steps:
List all Docker images on the system along with their tags and find the correct image to be pushed:
# List images by name and tag.docker image ls
Tag the image with the desired repository and name:
# Tag the imagedocker tag <image_name> <dockerhub_username>/<docker-repo-name>
Upload the tagged image to Docker Hub using the following command:
# Push the Docker imagedocker push <dockerhub_username>/<docker-repo-name>:latest
This command will upload the image to the specified repository on Docker Hub.
Example:
 Example of Docker Push Commands
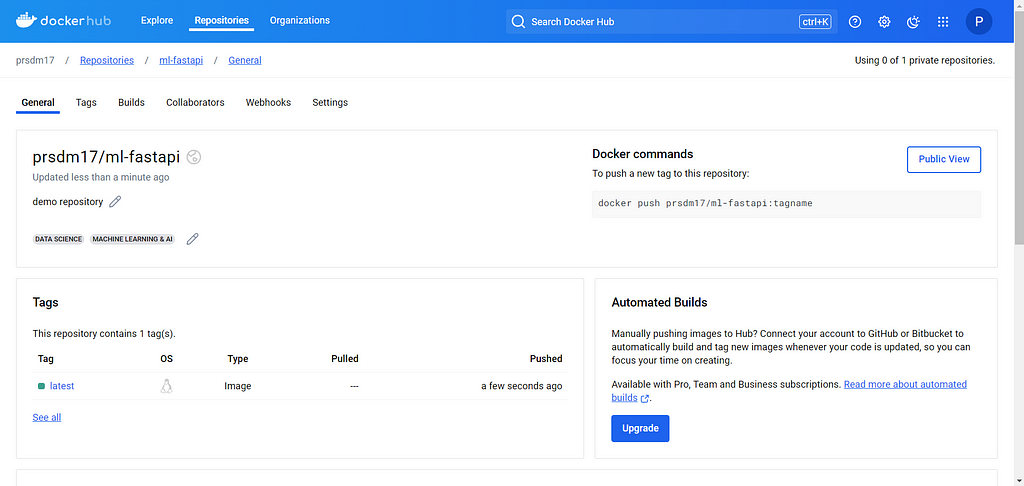 Example of Docker Hub Repository
Now that we have pushed the Docker image to Docker Hub, we can move on to deploy it on AWS Elastic Container Service (ECS).
AWS ECS
AWS ECS is a fully managed container orchestration service that allows running and scaling Docker containers on AWS easily. It supports both EC2 and Fargate launch types. Here is a step-by-step guide:
First, create an ECS Cluster:
- Step 1: Log in to the AWS account then go to the ECS service and create a new ECS cluster by selecting “Create Cluster.”
- Step 2: Give a name to the cluster, select AWS Fargate (serverless), and click on “Create.” (This will take a few minutes.)
 Example of AWS Cluster
Then, define a Task Definition:
- Step 1: In the ECS console, go to “Task Definitions” and create a new task definition.
- Step 2: Give the task a name and configure settings such as memory and CPU requirements.
- Step 3: Docker image URL from Docker Hub in the container definitions and keep the container port mappings default. Click on “Create.”
 Example of Task Definition
After that, add a Security Group:
- Step 1: Go to EC2, then in Networks and Security, select Security Groups and click on “Create Security Group.” Give it a name and description.
- Step 2: In Inbound Rules, select the type HTTP and source Anywhere-IPv4 first, then do the same for Anywhere-IPv6. Click “Create Security Group.”
 Example of AWS security Group
Then, create a Service:
- Step 1: Go to the ECS cluster that was created and add a new service.
- Step 2: Select the ‘launch type’ compute options and ‘Fargate’ launch type. Then select the task definition that was created and give the service name in the deployment configuration.
- Step 3: Finally, select the security group created earlier under Networking and click “Create.” (This will take 5–8 minutes to create the service.)
 Example of services
And Finally, Access the Running Service:
Once the service is deployed, go to the ECS cluster’s “Services” tab. Find service, go to the “Tasks” tab, and select a running task. Open the public IP address of the task to access the FastAPI application. It will look something like this:
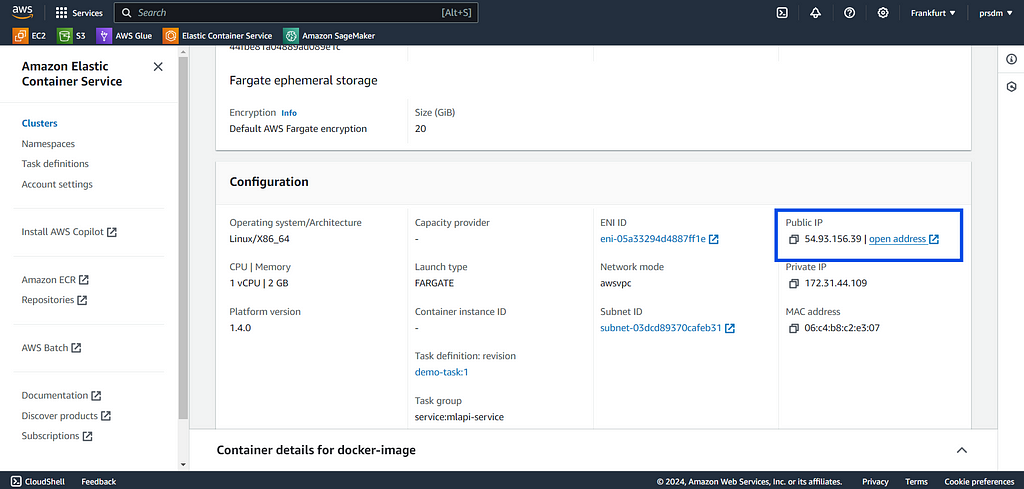 Example of Public IP
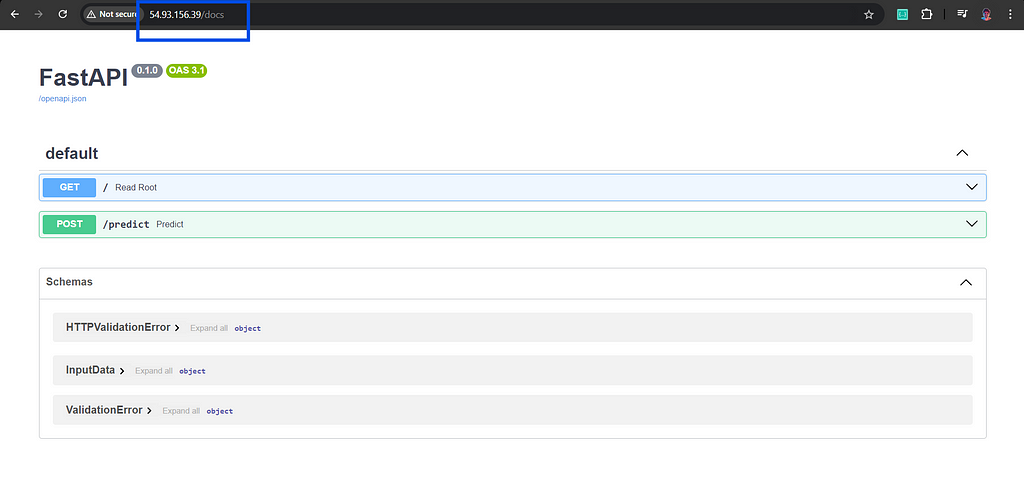 Example of deployed service
By following these steps, we can deploy the FastAPI application in a Docker container to AWS ECS. This enables a scalable and manageable environment for serving machine learning model.
Note: We can also add Elastic Load Balancing (ELB) if needed.After successfully deploying the model, the next step is to continuously monitor the model in production to ensure it performs well on production data. Model monitoring involves evaluating various factors such as server metrics (e.g., CPU usage, memory consumption, latency), data quality, data drift, target drift, concept drift, performance metrics, etc.
To keep it beginner-friendly, we are going to focus on a few methods such as data drift, target drift, and data quality using Evidently AI.
Evidently AI
Evidently AI is a good tool for monitoring model performance, detecting data drift, and data quality over time. It helps ensure that the model remains accurate and reliable as new data comes in. Evidently AI provides detailed insights into how model performance evolves and identifies any significant shifts in the data distribution, which is crucial for maintaining model accuracy in production environments.
To install Evidently AI use the following command:
#to installpip install evidently
#or
pip install evidently @ git+https://github.com/evidentlyai/evidently.git
Next, run monitor.ipynb file to detect data quality, data drifts, and target drifts. The file looks something like this:
# If this .py file doesn't work, then use a notebook to run it.import joblib
import pandas as pd
from steps.clean import Cleaner
from evidently.report import Report
from evidently.metric_preset import DataDriftPreset, DataQualityPreset, TargetDriftPreset
from evidently import ColumnMapping
import warnings
warnings.filterwarnings("ignore")
# # import mlflow model version 1
# import mlflow
# logged_model = 'runs:/47b6b506fd2849429ee13576aef4a852/model'
# model = mlflow.pyfunc.load_model(logged_model)
# # OR import from models/
model = joblib.load('models/model.pkl')
# Loading data
reference = pd.read_csv("data/train.csv")
current = pd.read_csv("data/test.csv")
production = pd.read_csv("data/production.csv")
# Clean data
cleaner = Cleaner()
reference = cleaner.clean_data(reference)
reference['prediction'] = model.predict(reference.iloc[:, :-1])
current = cleaner.clean_data(current)
current['prediction'] = model.predict(current.iloc[:, :-1])
production = cleaner.clean_data(production)
production['prediction'] = model.predict(production.iloc[:, :-1])
# Apply column mapping
target = 'Result'
prediction = 'prediction'
numerical_features = ['Age', 'AnnualPremium', 'HasDrivingLicense', 'RegionID', 'Switch']
categorical_features = ['Gender','PastAccident']
column_mapping = ColumnMapping()
column_mapping.target = target
column_mapping.prediction = prediction
column_mapping.numerical_features = numerical_features
column_mapping.categorical_features = categorical_features
# Data drift detaction part
data_drift_report = Report(metrics=[
DataDriftPreset(),
DataQualityPreset(),
TargetDriftPreset()
])
data_drift_report.run(reference_data=reference, current_data=current, column_mapping=column_mapping)
data_drift_report
# data_drift_report.json()
data_drift_report.save_html("test_drift.html")
Example of Test data:
 Example of Test data quality and drift detect
Example of Production data:
 Example of Production data quality and drift detect
Run the monitoring script regularly on incoming data to generate reports on data drift and model performance. These reports can help us identify when retraining is needed and ensure that our model remains accurate and reliable over time.
With this step, we have successfully completed the MLOps project implementation.
Summary
In this article, we covered basic MLOps practices and tools through a hands-on project. We versioned data with DVC, tracked and registered models using MLflow, and deployed a model with FastAPI, Docker, and AWS ECR. We also set up model monitoring (data quality, data drift, and target drift) with Evidently AI. These steps provide a solid foundation for managing machine learning projects using MLOps tools and practices, from development to production. As you gain experience with these tools and techniques, you can explore more advanced automation and orchestration methods to enhance your MLOps workflows.
Reference
- Machine Learning Operations (MLOps): Overview, Definition, and Architecture. (https://arxiv.org/pdf/2205.02302)
- Data Version Control (DVC): https://dvc.org/doc
- MLflow: https://mlflow.org/docs/latest/index.html
- FastAPI: https://fastapi.tiangolo.com/tutorial/
- Docker: https://docs.docker.com/
- Evidently AI: https://docs.evidentlyai.com/tutorials-and-examples/examples
Subscribe for free to get notified when I publish a new article.
Get an email whenever Prasad Mahamulkar publishes
You can also find me on LinkedIn and Twitter!
Machine Learning Operations (MLOps) For Beginners was originally published in Towards Data Science on Medium, where people are continuing the conversation by highlighting and responding to this story.


 English (US)